


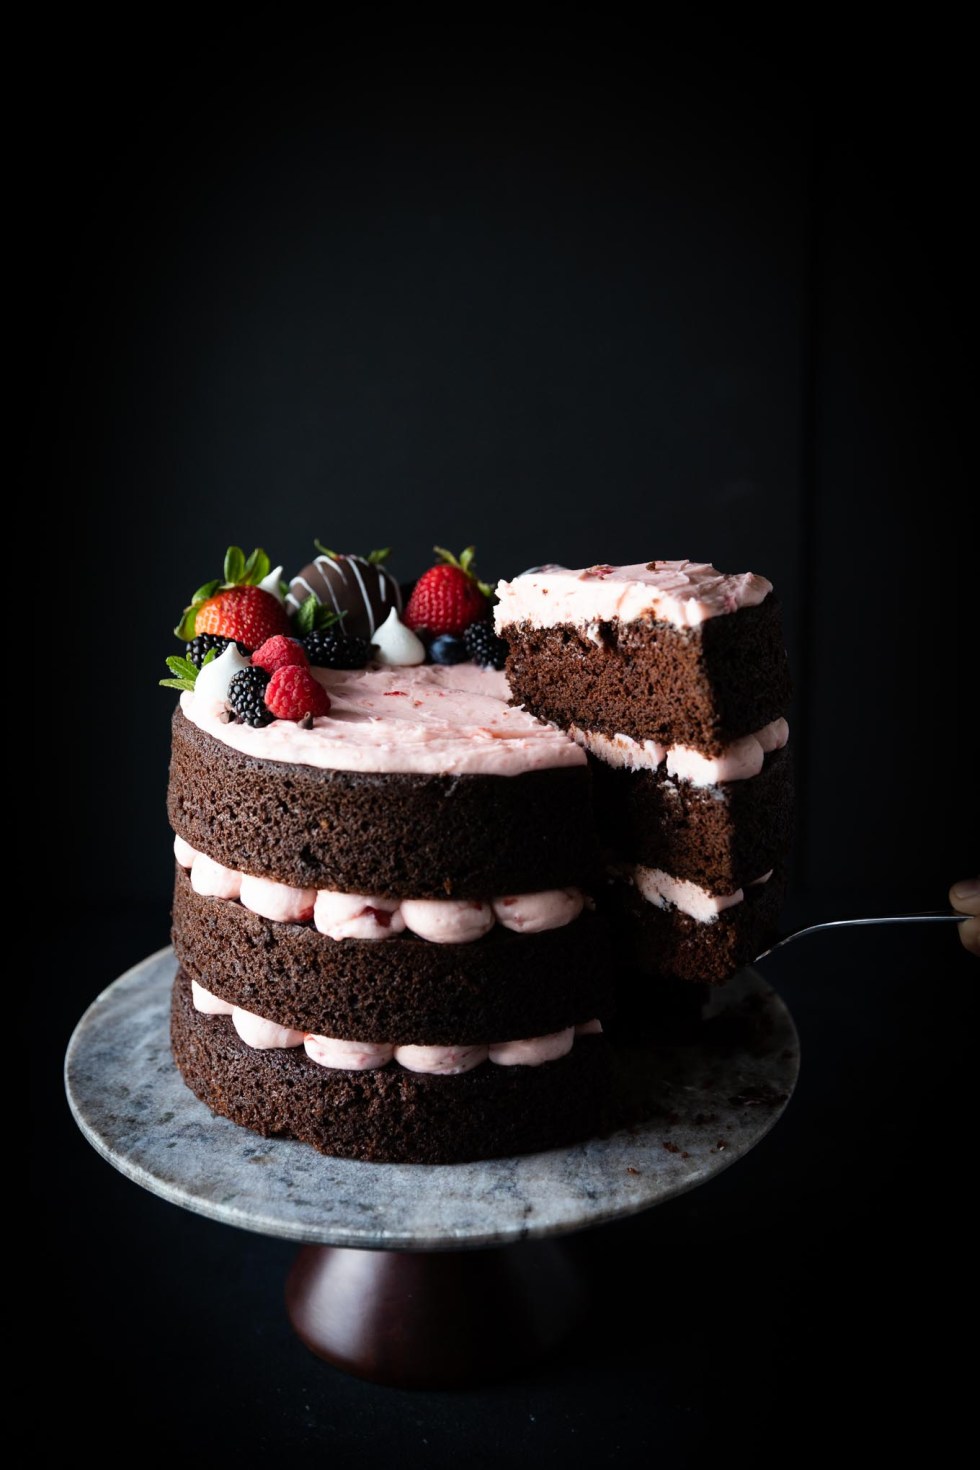
My first wedding cake!
Chocolate cake with strawberry buttercream. Nothing to strike true terror and excitement into one’s heart than making a wedding cake. Then again, I had the most easy-going wedding couple ever! I even had to pin my father-in-law and his wonderful now-wife down on flavor requests. All I had to work with were: chocolate cake and naturally-colored strawberry frosting…
Commence insane amounts of test cake, test frosting, test filling, test freezing, and test transit. Wait, what’s that you say? Mikaela, why on earth would you need to test freezing and transit? Oh. Did I not mention that the wedding is in New Mexico??? So that I didn’t just dissolve into a puddle of nerves, I came up with a wedding cake plan 101.
Wedding Cake Plan 101:
- The Goal. 30+ people. One 3-layer centerpiece cake and two 2-layer accent cakes.
- The Research. Stay up late, obsessively pinteresting chocolate strawberry cakes in bed.
- The Test Cake. Put my go-to chocolate cake up against two other chocolate cake recipes. Where wedding cake is on the line, there can be no time for vanity. I needed the BEST. (And then in a blind taste test, David and my friends picked my recipe. #loveyouguys4ever)
- The Skillz. MASTER the art of flat cakes. *tin-foil/paper towel explanation below!
- The Test Filling. Test three different strawberry fillings: jam + buttercream, sliced berries + buttercream, & strawberry buttercream. Due to the intimidating New Mexico heat . . . I decided to play it safe with a naked cake and straight-up strawberry buttercream.
- The Transit. The thought of baking seven chocolate cake layers in not-my-oven and not-my-kitchen was scary. Really scary. So I baked all layers ahead of time, froze them, and transported them in coolers in the back of the car. (Tips on freezing cake, below.)
- The Toppers. Does anyone need an excuse to layer fresh berries with chocolate covered strawberries and mini meringues?
Annnnndddd try not to pass out when my husband, brother-in-law, sister-in-law, and myself had to transport the three finished chocolate cakes with strawberry buttercream in the car via bumpy road with the air conditioning blasting. Lost a few years off my life there.
But they loved it! Hurray! Disasters averted. Beautiful couple married under the trees in a gorgeous ceremony surrounded by friends and family. Time to go pull some of that test cake out of the deep freeze, because I am now hungry.


How to Bake Flat Cake Layers
Below I have included written instructions, but here is a full tutorial for making cake strips with pictures. And all you need is aluminum foil, some paper towels, and some water.
- Measure the circumference (exterior edge) of your cake pan and tear a piece of aluminum foil that is 4″ longer than that. Lay it out flat on your countertop.
- Pull enough paper towels such that when they are laid flat on top of the aluminum foil, the foil extends a couple inches past the paper towels on each side.
- Bunch up the paper towels and run them under water so that they are thoroughly soaked. Lightly squeeze the paper towels to ring out excess water, so the paper towels are very wet but not dripping.
- Lay the paper towels back out on top of the aluminum foil. Fold the top longer edge of the towels down to the bottom longer edge, keeping the full length of the circumference, since you’ll eventually wrap this around your cake pan (hot dog-style, if you remember your kindergarten instructions). Repeat this until the height of your paper towel strip is not taller than your cake pan.
- Move the paper towel strip to one edge of the aluminum foil. Fold one of the longer edges of the aluminum foil up and over the paper towel strip and continue folding the foil-covered strip over and over to the other longer edge of the foil. This should result in a long foil-wrapped paper towel strip that is as long as your circumference and no taller than your cake pan.
- Wrap the foil strip around the outsides of your cake pan. Bring the ends together and twist the ends in order to secure the foil strip around the cake pan.
- Bake your cake like normal! (It may take 3-5 minutes longer than usual.)
The outer edges of cake bake more quickly because of the hot cake pan sides. When the outer edge bakes more quickly, they “set” more quickly, preventing the edges from rising any further, while the middle continues to rise. By wrapping the pan in the foil strip, you insulate the pan and the edges “set” at a rate that is closer to the rate at which the middle of the cake sets!
How to Freeze Cake Layers
Freezing cake layers is magical. In my experience, you can freeze cake layers weeks in advance and, once thawed, they still taste just as great. And bonus – they are easier to decorate when they are cold. Before you even bake your cake, make sure your freezer is clean and you’ve refreshed the baking soda box. You don’t want your frozen cakes soaking up any weird smells.
After you’ve baked your cake, let the layers cool completely. I usually leave the parchment circle on the base of the layer for freezing. Wrap each layer completely in plastic wrap. Then wrap each layer in aluminum foil. Place the layers in the freezer (not stacked). After 24 hours in the freezer, you can stack the layers to make room. (For more cake, duh.) When you’re ready to use the cake layers, move them to the refrigerator to thaw for 24 hours.
Let them eat cake!


mikaela | wyldflour
One 2-layer, 8-inch or 9-inch cake
A light chocolate cake that pairs perfectly with fresh strawberry buttercream!
30 minPrep Time
40 minCook Time
1 hr, 10 Total Time
 Save Recipe
4.8 based on 6 review(s)
Ingredients
- 2 cups + 2 Tablespoons all-purpose flour
- 1/4 cup shortening
- 1 3/4 cup white granulated sugar
- 3/4 cup cocoa powder
- 1 Tablespoon instant espresso powder (optional)
- 1 teaspoon baking powder
- 1 teaspoon baking soda
- 1 1/2 teaspoons salt
- 1/2 cup canola or vegetable oil
- 3 eggs
- 1 1/3 cups water
- 1 teaspoon vanilla extract
- 1 cup unsalted butter
- 1/2 cup minced fresh strawberries
- 6 cups powdered sugar
- 1-3 Tablespoons pureed ripe strawberries
- Fresh berries
- Chocolate covered strawberries
- Mini meringues
- Mint leaves or other greenery
Instructions
- Preheat the oven to 335 degrees Fahrenheit. Prep the cake pans. This recipe will fill two 3-inch deep 8-inch pans or two 2-inch deep 9-inch pans. Use softened butter to liberally grease the cake pans and line the bottom of the pan with a parchment circle.
- Make the cake! Add flour, shortening, and sugar to a food processor and pulse until the texture is that of sand. Dump the flour/sugar mixture into a large bowl. Stir in cocoa, espresso, baking powder, soda, and salt. Add oil, eggs, and water to the mixing bowl. Beat mixture on the lowest speed for 30 seconds until ingredients are moistened. Scrape down the sides of the bowl. Beat on medium speed for 2 minutes.
- Divide batter between cake pans and bake for 38-40 minutes. When you first test for doneness, open the oven door and use a hot pad to jiggle the oven rack. If the middle of the cake jiggles, it's not done yet - put it back in for a couple minutes! (If you stab with a toothpick too early, then it will deflate and possibly sink a little in the middle.) If the cake does not jiggle, insert a toothpick into the middle--it should come out with a few crumbs attached to it. Remove the cakes and place the pans on cooling racks. Cool in pans ten minutes, then turn the cakes out onto the cooling racks to cool completely.
- Make the strawberry buttercream! Beat the butter until it is fluffy. Beat in the minced strawberries. Beat in the sugar 1 cup at a time. Add as much pureed strawberries as you like until you reach the color and consistency you would like!
- Assemble your chocolate strawberry cake! Fit a piping bag with a 1/2 inch piping tip or cut a corner off a plastic bag so that the cut measures 1/2 inch. Fill the piping bag with buttercream. Pipe little 1-inch blobs of buttercream around the very outer edge of the first cake layer. Pipe buttercream in to fill the middle of the cake, within the ring of blobs. Gently place the second cake on top of the first layer. Spread buttercream across the top of the cake and decorate with whatever toppers you prefer!
Notes
Low Altitude Adjustments: drop the flour to 2 cups and add 1 teaspoon baking powder. Preheat the oven to 315 degrees Fahrenheit and bake for 41-43 minutes.
Nutrition Facts: See below or look up "Wyldflour Chocolate Cake with Strawberry Buttercream" in myFitnessPal.
Calories
Fat
Carbs
Protein


Comments